


Mute Mods: Mating Mute & Mastery for Maximum Mirth

(Originally Posted: 08/22/22)
In a recent video over on my YouTube channel, I once again champion the Fender Mute and the delightful tones that simple little mechanism can add to a musician’s textural toolkit. As found on original Jaguars and Bass VIs, this spring-loaded plate is an easy way to go from full-bodied sustain to 1960s percussive sounds in an instant, almost as if you’re playing in a vacuum. Sustain disappears immediately in favor of attack and some rumble, but not much more.

I spend the bulk of that video discussing setup techniques to ensure smooth operation and to reduce the degree to which the mute can push the strings quite sharp when engaged, concepts which I more fully elucidate in Part 5 of our Demystifying series. There, I take you step-by-step through the process of mute setup which is the very same process I use regularly on my own guitars as well as those I maintain.
However, one point I did not address in the blog is the fact that in its stock form, you can’t use a Mastery Bridge with the Fender Mute. If you’re a fan of the Mastery like I am, you’ll know that one of its greatest strengths are the oversized bridge posts which fill the metal body insert cups (aka bridge thimbles) keeping the bridge stationary.

This means the Mastery is a fixed bridge as opposed to the stock floating bridge of the Jazzmaster, Jaguar, Mustang, and Bass VI, which are designed to rock back and forth along with the strings as the vibrato is manipulated. When set up correctly, this Leo Fender-designed system works perfectly, but still many players prefer aftermarket bridges for one reason or another––as it is with all things guitar-related.
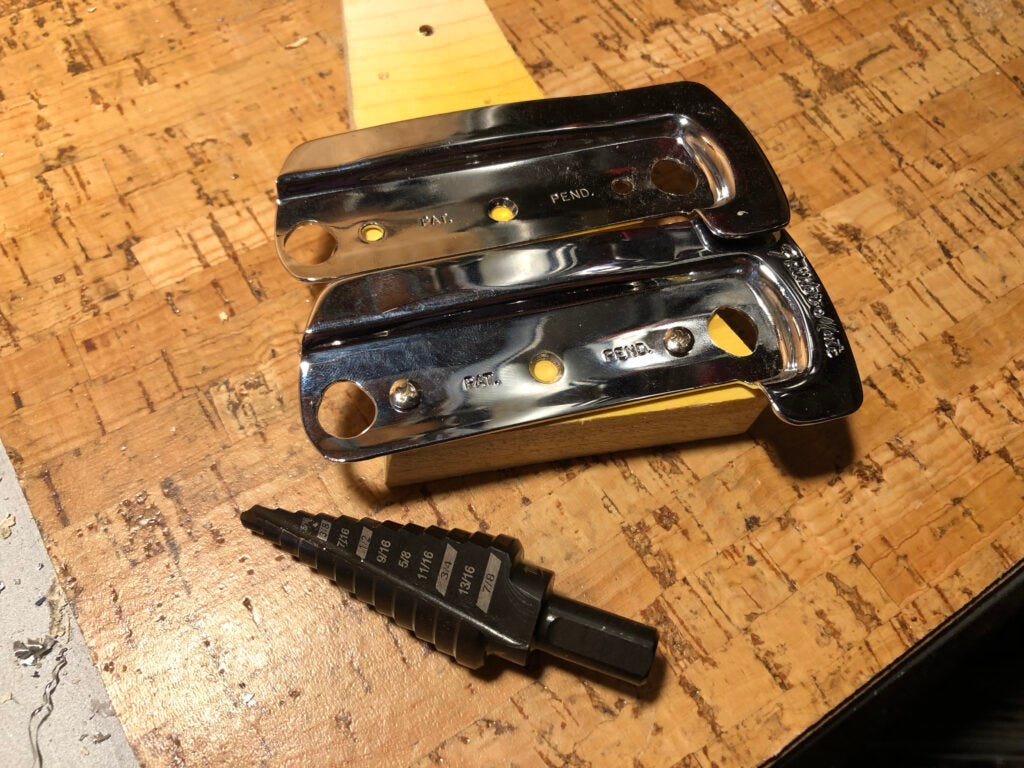
Thankfully, all it takes to modify the Mute plate to work with a Mastery Bridge is widening the holes machined into the Mute which allow the stock bridge posts to pass through it.
I used a Step Drill Bit, the very same kind I’ve used for years to drill out holes in pedal enclosures and chrome guitar control plates. I got mine at a local hardware store for around $50, which is a lot if you’re only doing one of these. Being that this modification is a rather common request around these parts, I feel like I’ve already made my money’s worth.
To begin, I secured the Mute plate to a spare block of wood using the very same body mounting screws that are included with the Mute kit. I did this just so I would be able to hold the plate firmly while I’m drilling, keeping it from spinning out of my hand and potentially causing injury.
With the step bit firmly chuck’d into the drill press, I roughly centered the bit and slowly widened those holes out to 3/8”, the exact diameter of the Mastery thimbles, which are a bit wider than the posts.
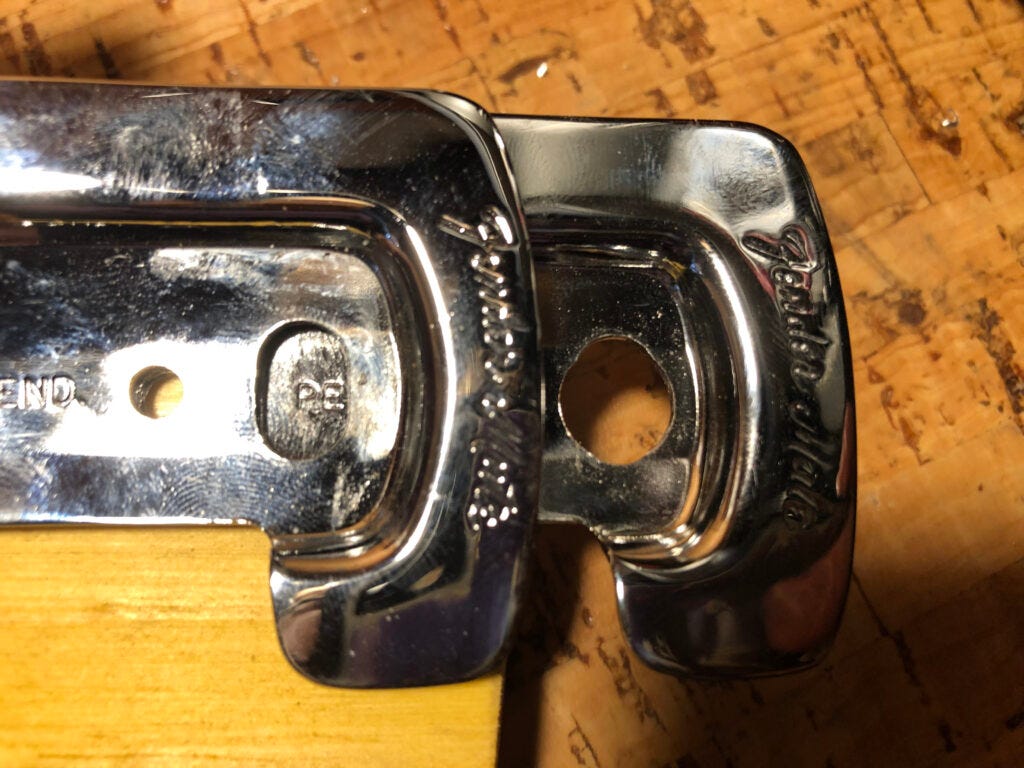
Why didn’t I widen them even more? Because there’s not a lot of space left between the holes and the edge of the mute plate on the bass side that I don’t dare risk losing too much material on that edge.
And why did I only ‘roughly’ center the bit on the pass-thru holes? Well, because we also don’t want these holes to be perfectly round, either. For the mute plate to function properly, they need to be oblong, oval; otherwise, they’re likely to grip the Mastery posts as the plate pivots back and forth, pulling the bridge out of its thimbles.
After modifying those holes, I used a file to achieve that oval shape I mentioned before, and payed close attention to how the mute plate fit around the bridge thimbles. I removed material on the bass side to ensure a loose fit, and finished off by smoothing over the rough edges left on the plate from the drill.
After all of that’s been taken care of, there’s not much more to the process than to follow the instructions in my Mute guide mentioned above. Treat the Mastery and Mute assembly the way you would on an entirely stock guitar and you’ll be golden.
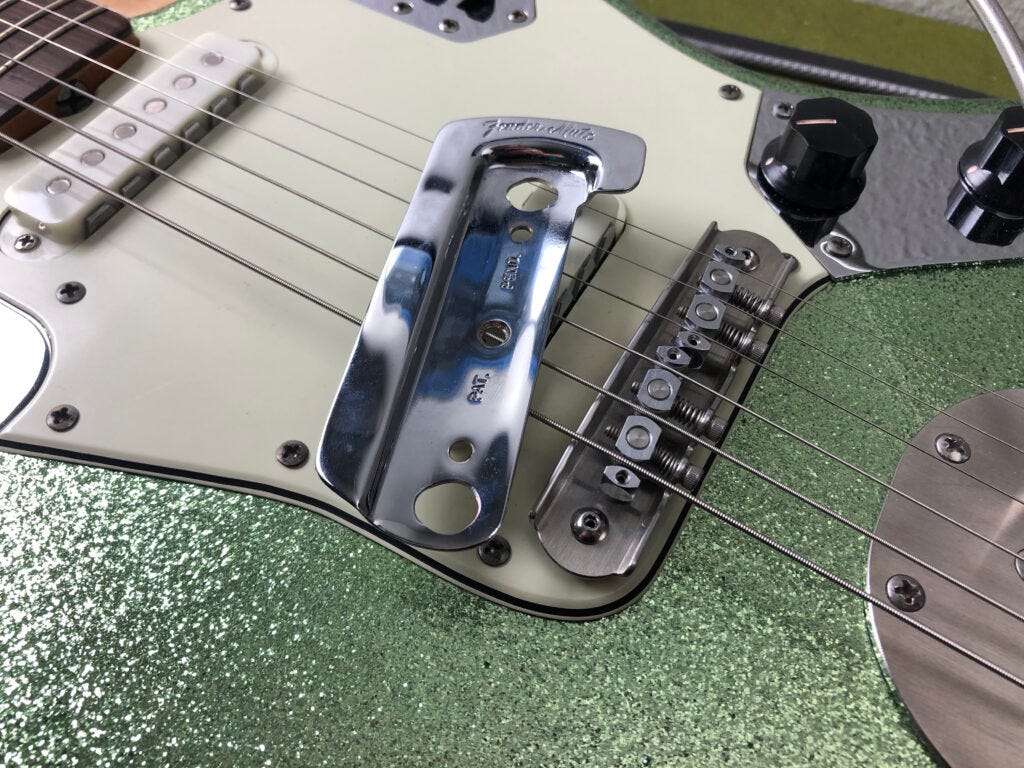
In fact, it may be easier to work on the mute with a Mastery since the posts are mounted to the bridge base via domed screws. You can simply remove the bridge base to access the Mute mounting screws instead of having to remove the entire bridge––posts and all––over and over again.
One note about shimming: with the stock bridge I find that about 1 full degree of pitch-back on the neck seems ideal. The Mastery is meant to sit lower on the body than stock, and I normally aim for the Mastery to sit between 3 and 4 mm above the pick guard. I find that most Jaguars with this bridge do just fine with around .75-.8 degrees of angle on the neck. You may need more, but likely not less.
Hopefully this helps those of you out there who wish to retain either the functionality of the Fender Mute with a Mastery, or even just the look. Either is a valid reason!
